Hardware Details
The board has three main chips and a 2.5 V voltage reference around an SGX-4CL2 chlorine cell. The LMP91000 analog front end biases the cell and turns its current into a voltage, the reference supplies the front end's reference voltage, the ADS1115 converts the output voltage, and an ATtiny404 with factory firmware drives both of them on the board's own internal I2C bus. Your controller only talks to the ATtiny404, on the main bus that reaches the Qwiic connectors.
Key specifications
| Specification | Value |
|---|---|
| MCU | |
| Bridge MCU | Microchip ATtiny404 (factory firmware) |
| Interface | |
| Interface | I2C, plus analog and digital header pins |
| Qwiic compatible | Yes, 2 connectors |
| Default I2C address | 0x30 |
| I2C address changeable | Yes, 0x30 to 0x37 with the ADDRESS switch |
| Breadboard compatible | No |
| Power | |
| Supply voltage | 3.3 V (minimum and maximum), no regulator |
| Logic level | 3.3 V only |
| Other | |
| Gas cell | SGX-4CL2, electrochemical, chlorine (Cl2) |
| Measurement range | 0 to 10 ppm Cl2; maximum overload 100 ppm |
| Resolution | 0.1 ppm typical (electronics dependent) |
| Response time | T90 under 60 s |
| Repeatability | Below ±2% Cl2 equivalent; linear |
| Operating conditions | -20 to 50 °C, 15 to 90% RH |
| Expected cell life | Over 12 months in air |
| Analog front end | Texas Instruments LMP91000 |
| ADC | Texas Instruments ADS1115, 16-bit |
| Dimensions | 38 x 38 mm |
The gas-cell figures above are the SGX-4CL2's. Its datasheet also lists the cell's output signal, pressure range and cross-sensitivity to other gases.
Pinout
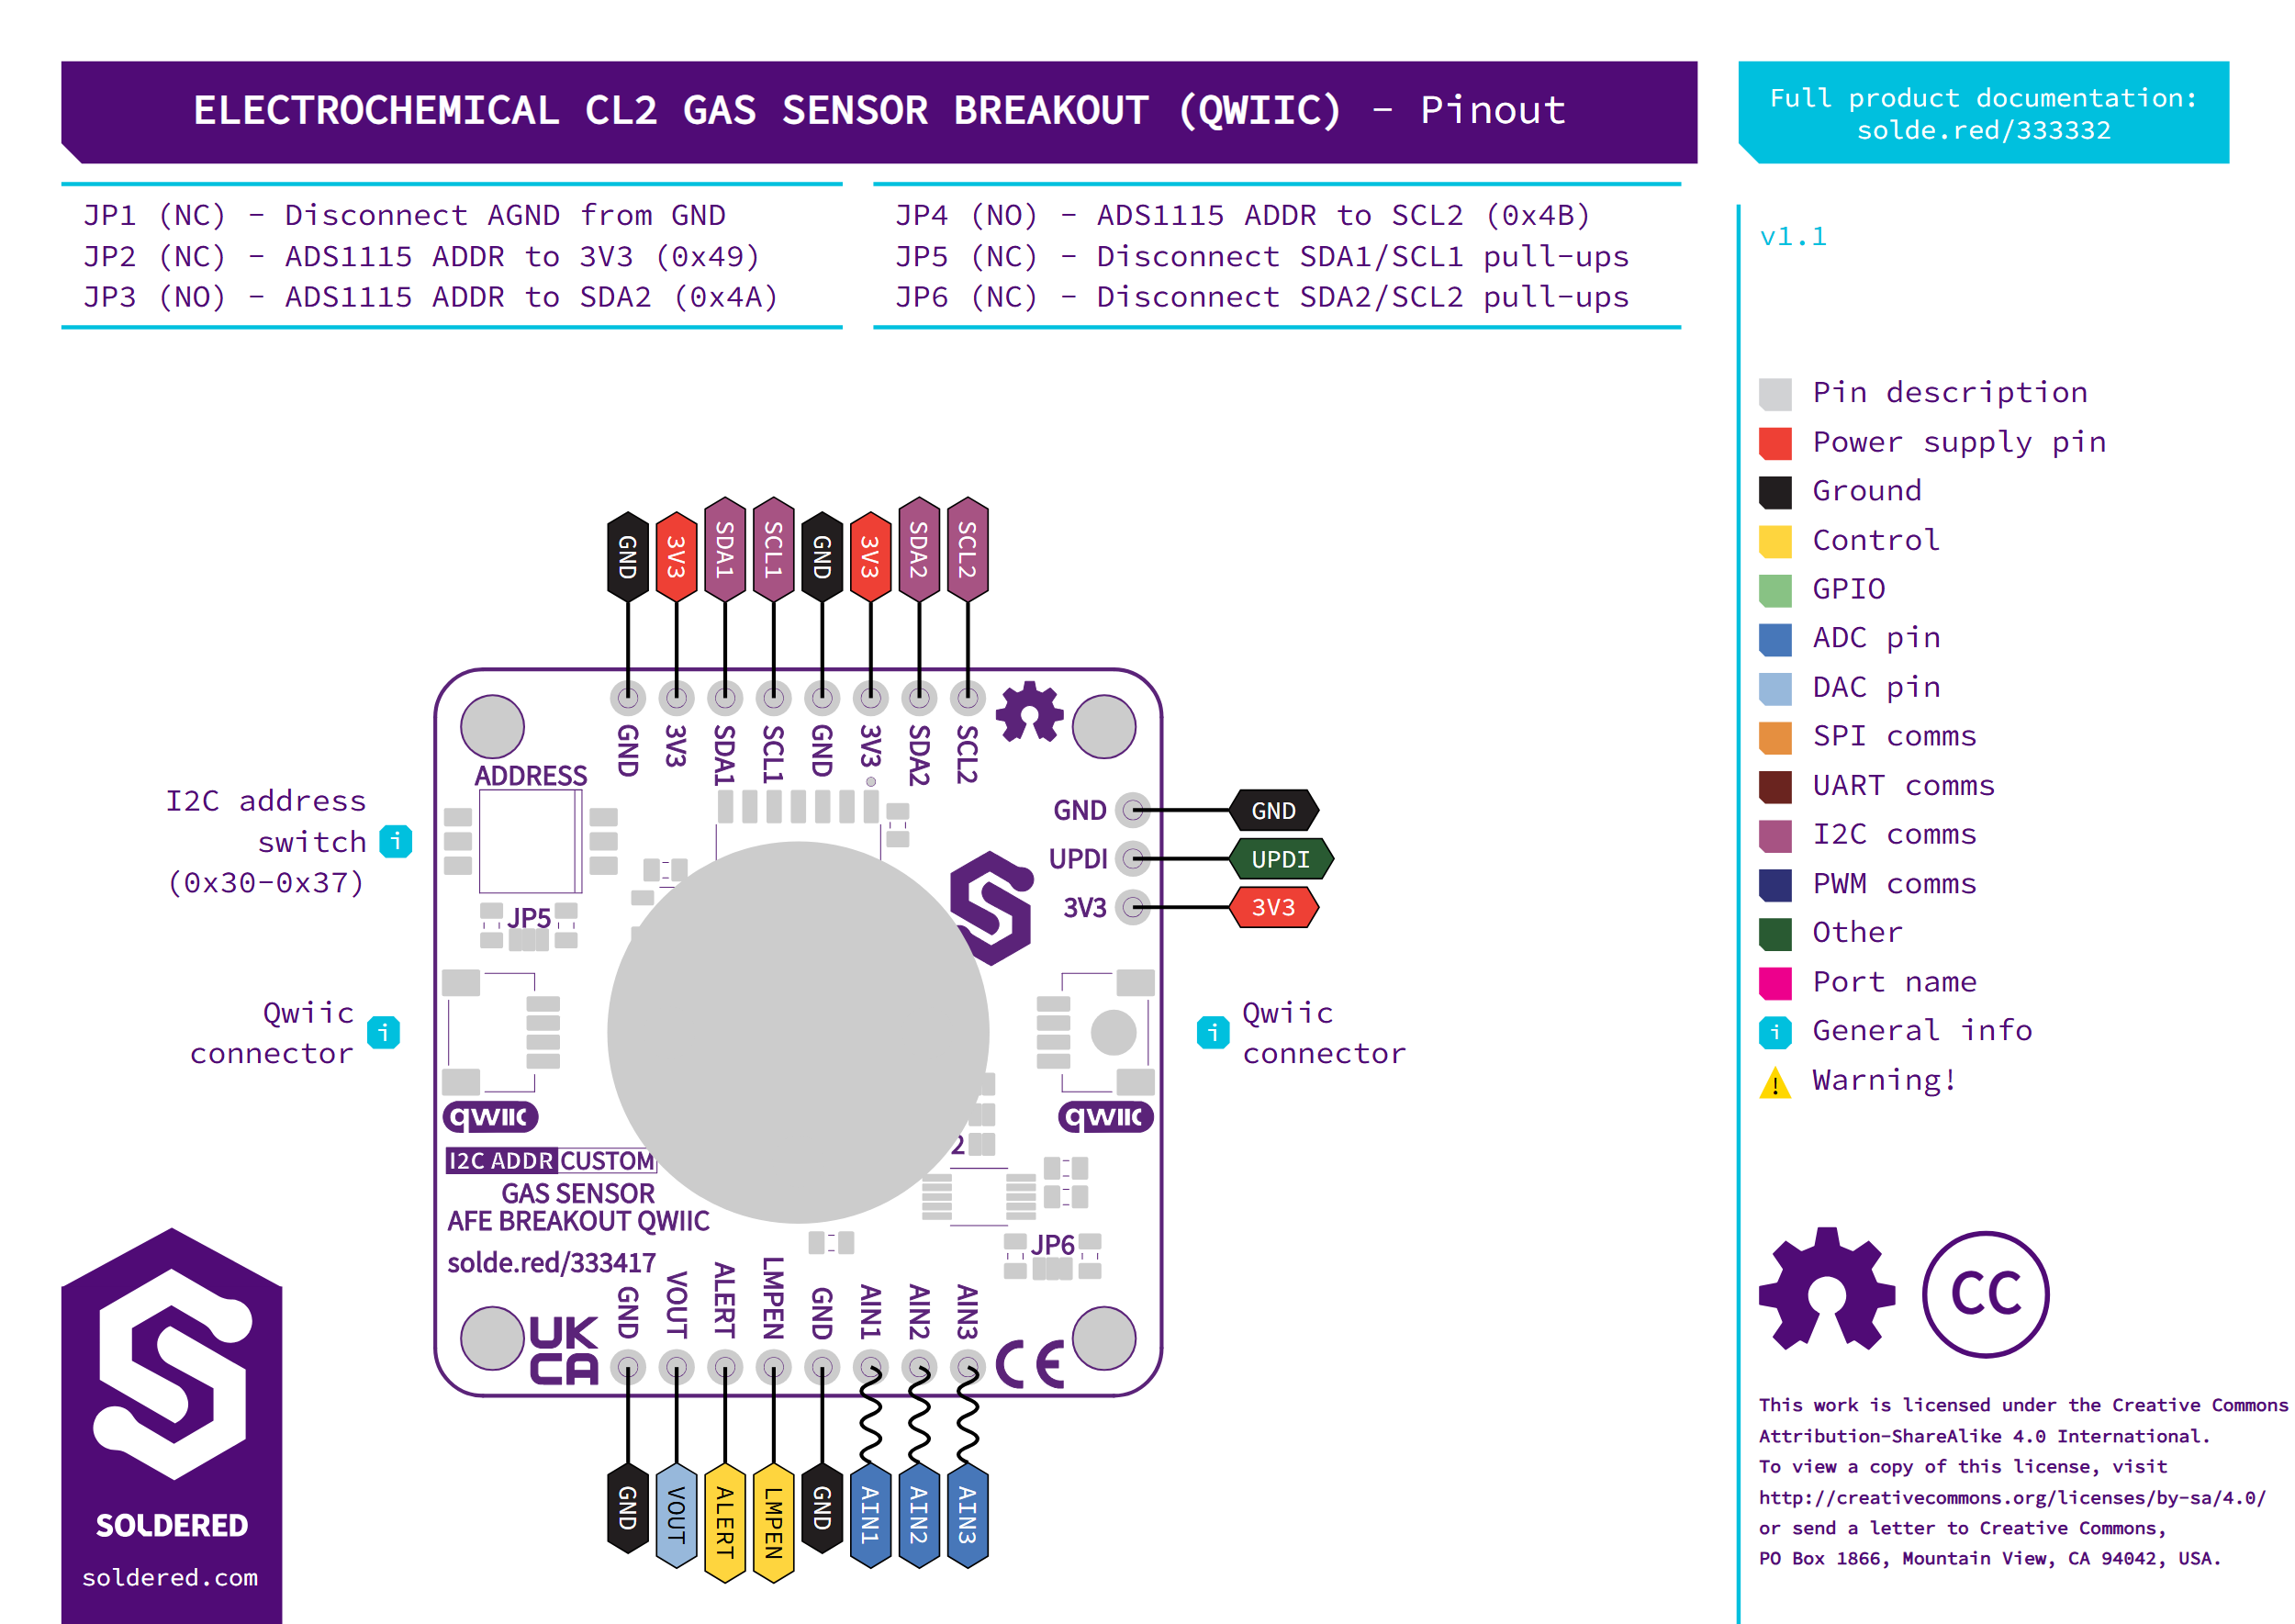
| Pin marking | Pin name | Description |
|---|---|---|
| Qwiic (x2) | 3V3, GND, SDA1, SCL1 | Power and the main I2C bus. Either connector works; both are the same bus. |
3V3 | 3.3 V supply | Power input, 3.3 V only. All 3V3 pins and both Qwiic connectors are the same rail. |
GND | Ground | All GND pins are connected. |
SDA1, SCL1 | Main I2C bus | The bus your controller uses, shared with the Qwiic connectors. 10 kΩ pull-ups to 3V3 (JP5). |
SDA2, SCL2 | Internal I2C bus | The ATtiny404's bus to the LMP91000 (0x48) and the ADS1115 (0x49 by default). 10 kΩ pull-ups to 3V3 (JP6). Do not connect your controller here. |
VOUT | Front-end output | The LMP91000's analog output, the cell signal as a voltage. It also goes to the ADS1115's first input and to the ATtiny404. |
ALERT | ADC alert | The ADS1115's ALERT/RDY pin, also wired to the ATtiny404. |
LMPEN | Front-end enable | The LMP91000's I2C enable input, active low. A 10 kΩ resistor holds it low, and it is also wired to the ATtiny404, so you leave it unconnected. |
AIN1, AIN2, AIN3 | ADC inputs | The ADS1115's other three inputs, for your own analog signals. |
UPDI | Programming pin | The ATtiny404's programming interface, on the three-pin header with GND and 3V3. |
The Arduino and MicroPython libraries read the gas cell only. Neither has a
function for reading AIN1 to AIN3.
Voltage and logic levels
| Connection | Supported voltage | Notes |
|---|---|---|
3V3 pins and Qwiic | 3.3 V | No regulator: the supply feeds every chip directly. |
SDA1, SCL1, SDA2, SCL2 | 3.3 V logic | Pulled up to 3V3 through 10 kΩ. |
VOUT | Analog | The LMP91000's output. The front end works from a 2.5 V reference on the board. |
AIN1 to AIN3 | Analog | The ADS1115's other inputs. |
Power the board from 3.3 V only. A 5 V supply on 3V3 or on a Qwiic connector
reaches every chip directly, because the board has no regulator.
Dimensions
The board measures 38 x 38 mm, with a 3.2 mm mounting hole in each corner. The gas cell sits on the underside.
Jumpers
All six jumpers are on the top side.
| Jumper | Default | Function |
|---|---|---|
| JP1 | Closed | Joins the analog ground (AGND) to GND. Open it to separate them. |
| JP2 to JP4 | JP2 closed, JP3 and JP4 open | ADS1115 address on the internal bus: JP2 ties ADDR to 3V3 (0x49), JP3 to SDA2 (0x4A), JP4 to SCL2 (0x4B). |
| JP5 | Closed | Connects the 10 kΩ pull-ups on SDA1 and SCL1. Open it to disconnect them. |
| JP6 | Closed | Connects the 10 kΩ pull-ups on SDA2 and SCL2. Open it to disconnect them. |
Never close JP3 or JP4 while JP2 is still closed: that ties SDA2 or SCL2
straight to 3V3 and stops the internal bus. Closing JP3 and JP4 together
shorts SDA2 to SCL2. Open JP2 first, then close only one of JP3 and JP4.
Never leave JP2, JP3 and JP4 all open: nothing else sets the ADS1115's ADDR
pin, so its address is not defined. Keep exactly one of the three closed.
The ADDRESS switch next to JP5 sets the board's own I2C address, from 0x30 to
0x37. Pass the address you set to the
library: ElectrochemicalGasSensor sensor(SENSOR_CL2, 0x30); in Arduino, or
adc_addr=0x30 in MicroPython.