Quick Start
Connect the breakout over Qwiic, install the library, and run an example that
prints a gas concentration in PPM every 2.5 seconds. Step 3 shows how to set it
up for this board's H2S cell. The board answers at I2C address 0x30 out of
the box.
You program the controller connected to this breakout. The breakout itself is not flashed.
- Arduino
- MicroPython
1. Connect the breakout board
Plug a Qwiic cable into either Qwiic connector on the breakout and into the Qwiic connector on your controller. Both connectors carry the same I2C bus and the same 3.3 V supply.
| NULA DeepSleep | Soldered Electrochemical H2S Gas Sensor Breakout (Qwiic) |
|---|---|
| Qwiic connector | Qwiic connector |
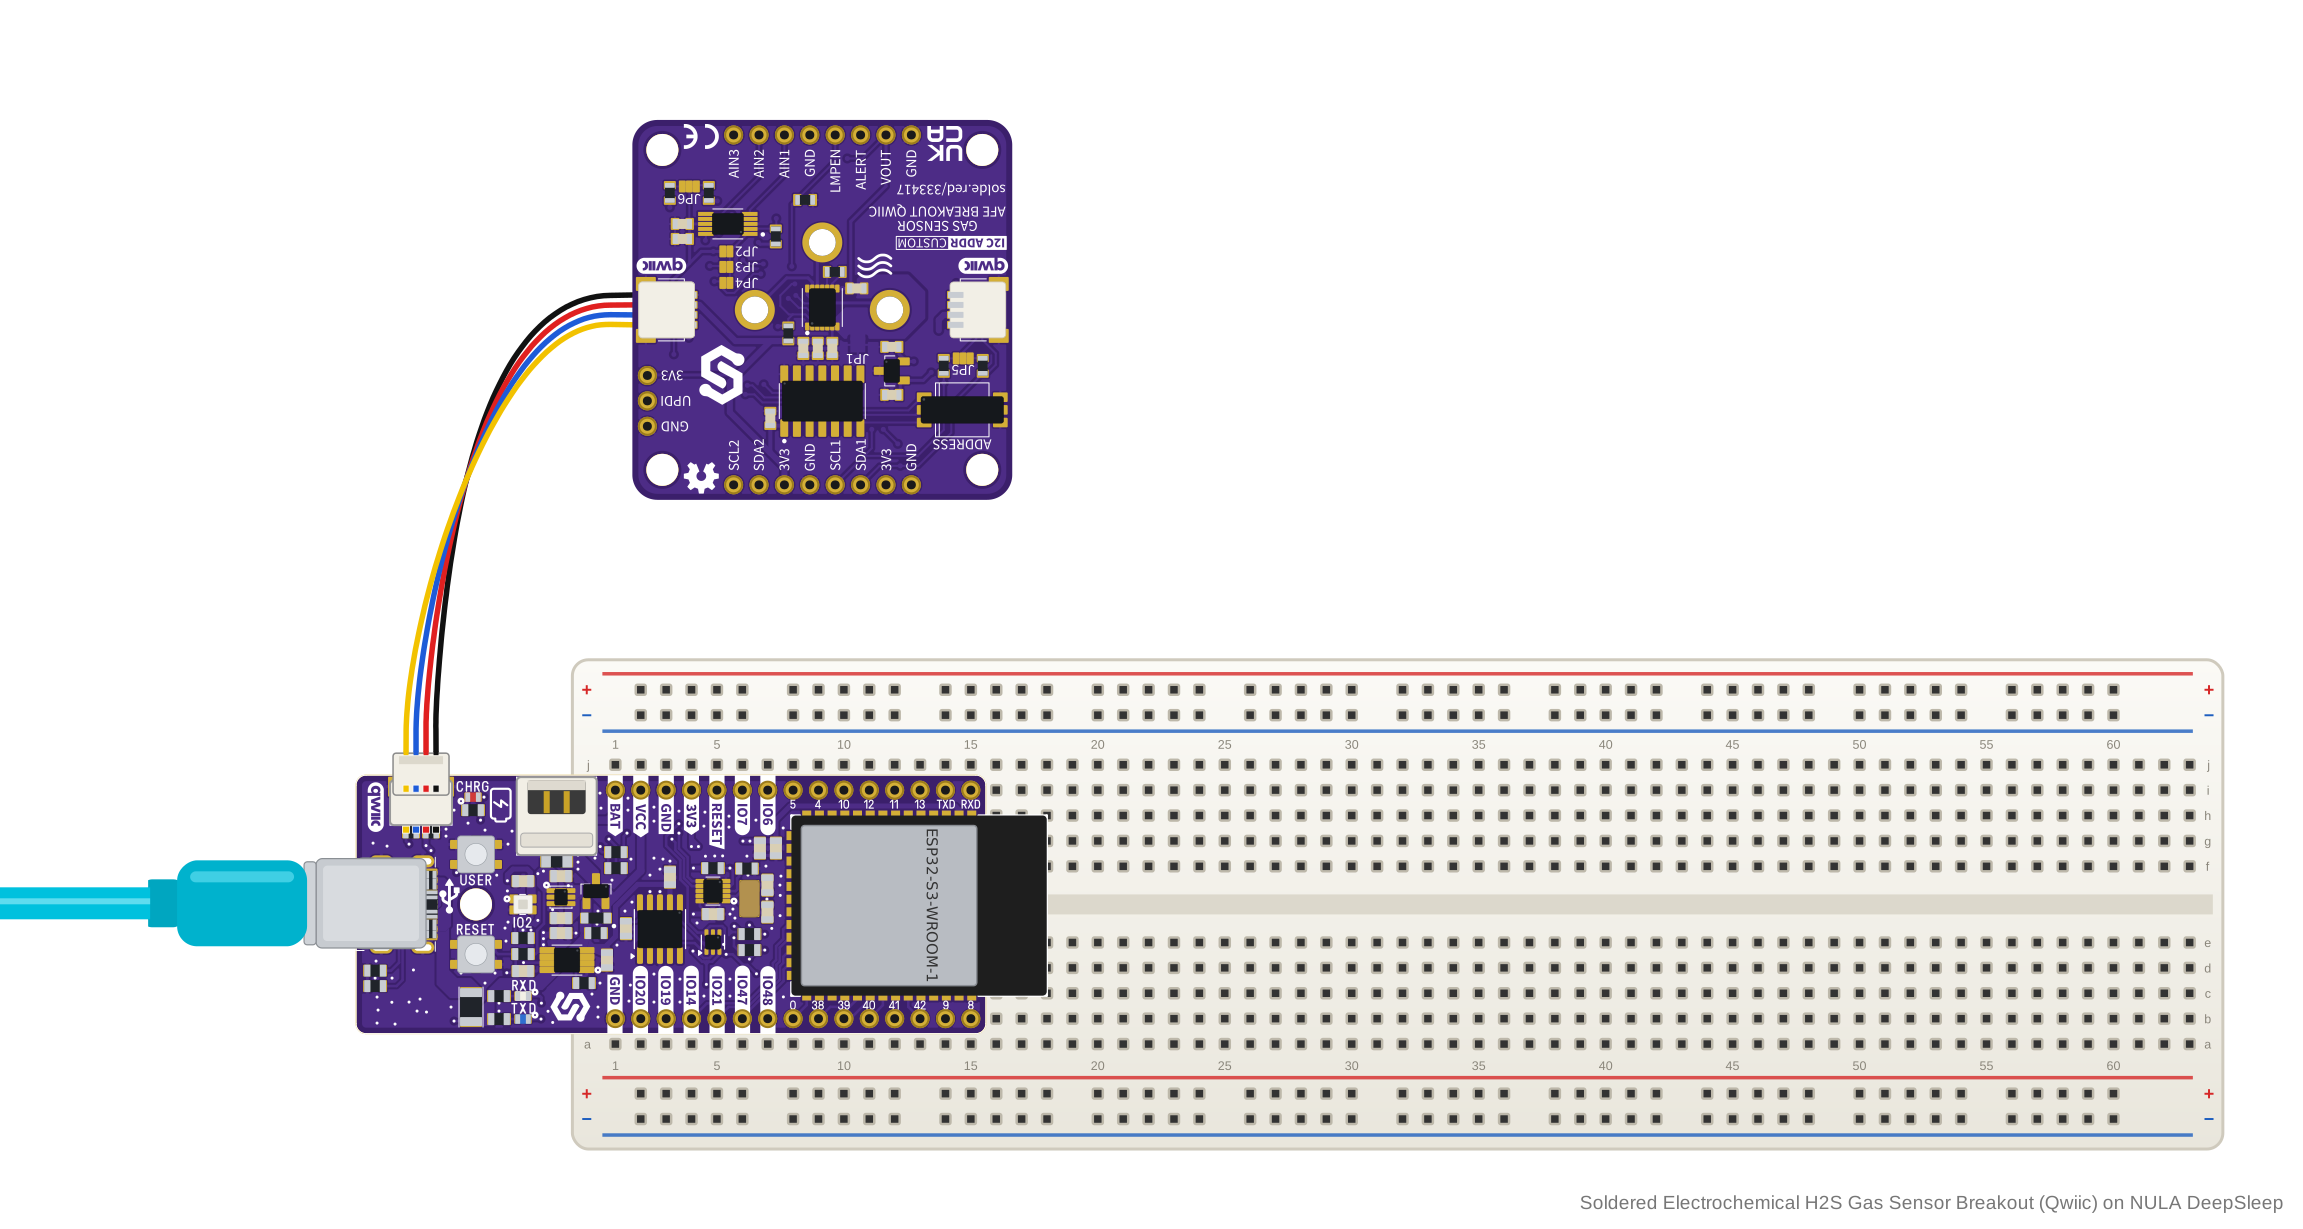
Without Qwiic: breadboard wiring
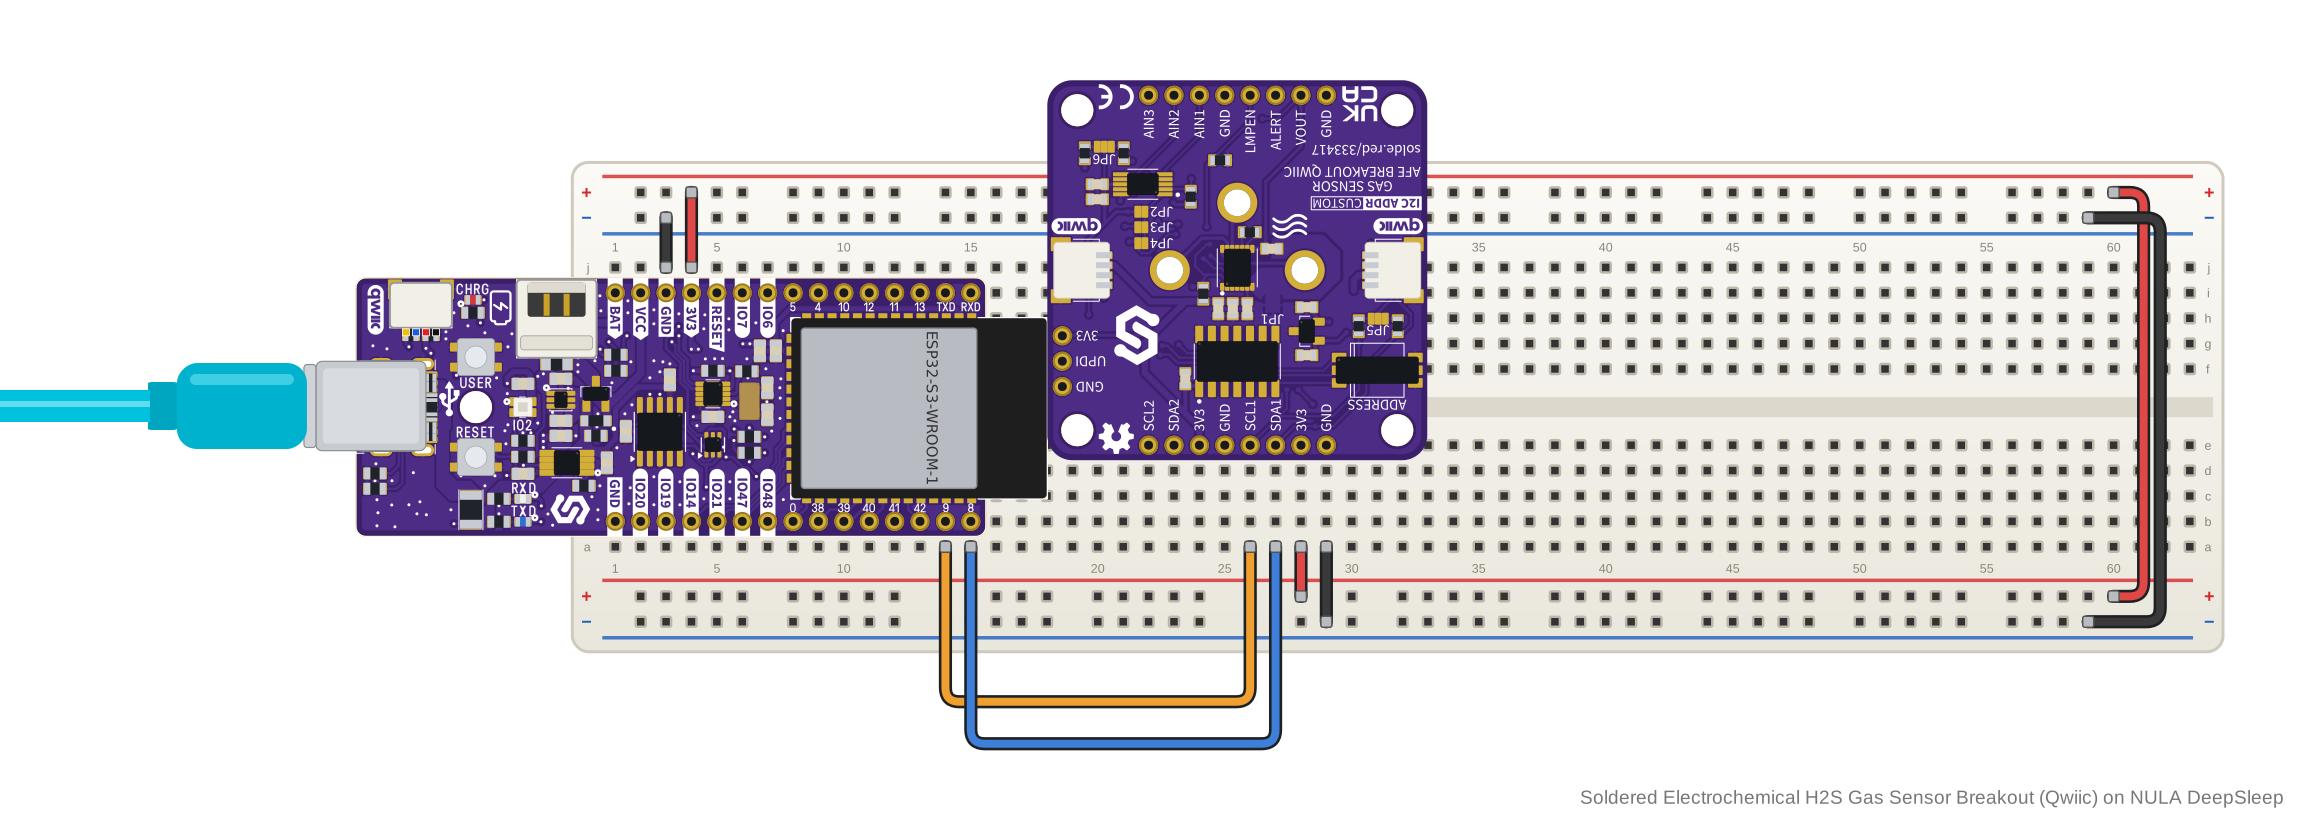
Use the top header row instead. Power the board from 3.3 V only: it has no regulator.
| NULA DeepSleep | Soldered Electrochemical H2S Gas Sensor Breakout (Qwiic) |
|---|---|
| GND | GND |
| 3V3 | 3V3 |
| IO8 | SDA1 |
| IO9 | SCL1 |
2. Install the library
Install Electrochemical Gas Sensor Soldered from its GitHub repository.
🔗Electrochemical Gas Sensor Soldered
Verified Arduino library at commit c4df54b
Tip: downloading from GitHub. On the library's GitHub page, click the green Code button and choose Download ZIP, then add it in Arduino IDE with Sketch → Include Library → Add .ZIP Library....
3. Run the first example
This is the library's bridgeBoard example, which talks to the board at
0x30. It is written with SENSOR_CO, the library's carbon monoxide preset,
so its PPM values are not H2S values.
Do not switch it to the library's SENSOR_H2S preset unchanged. That preset is
written for the SGX-4H2S-100 cell, with a sensitivity of 1200 nA per ppm. This
board carries the SGX-4H2S-300 cell, whose
datasheet
gives an output signal of 460 ± 140 nA per ppm, so with SENSOR_H2S the reading
comes out about 2.6 times too low.
Instead, give the library a custom sensor type: the SENSOR_H2S settings with
the SGX-4H2S-300's sensitivity, 460 nA per ppm. Add it above the line that
creates sensor, and pass it in place of SENSOR_CO:
const sensorType SENSOR_CUSTOM = {
    460.0F,                   // nanoAmperesPerPPM
    0,                        // internalZeroCalibration
    ADS_GAIN_4_096V,          // adsGain
    TIA_GAIN_7_KOHM,          // TIA_GAIN_IN_KOHMS
    RLOAD_10_OHM,             // RLOAD
    REF_EXTERNAL,             // REF_SOURCE
    INTERNAL_ZERO_20_PERCENT, // INTERNAL_ZERO
    BIAS_SIGN_POSITIVE,       // BIAS_SIGN
    BIAS_0_PERCENT,           // BIAS
    FET_SHORT_DISABLED,       // FET_SHORT
    OP_MODE_3LEAD_AMP_CELL,   // OP_MODE
};

ElectrochemicalGasSensor sensor(SENSOR_CUSTOM, 0x30);
The unchanged example follows.
// Include the required library
#include "Electrochemical-Gas-Sensor-SOLDERED.h"

ElectrochemicalGasSensor sensor(SENSOR_CO, 0x30);

void setup()
{
    Serial.begin(115200); // For debugging

    // Init the breakout
    if (!sensor.begin())
    {
        // Can't init? Notify the user and go to infinite loop
        Serial.println("ERROR: Can't init the sensor! Check connections and jumper address!");
        while (true)
            delay(100);
    }

    Serial.println("Sensor initialized successfully!");
}

void loop()
{
    // Make the reading
    double reading = sensor.getPPM();

    // If PPB is more relevant for your sensor, you can use:
    // double reading = sensor.getPPB();

    // Print the reading with 5 digits of precision
    Serial.print("Sensor reading: ");
    Serial.print(reading, 5);
    Serial.println(" PPM");

    // Wait a bit before reading again
    delay(2500);
}
4. Check the result
Open the Serial Monitor at 115200 baud. When the board answers, you see:
Sensor initialized successfully!
Sensor reading: 0.00217 PPM
Sensor reading: 0.00213 PPM
Sensor reading: 0.00216 PPM
Sensor reading: 0.00220 PPM
A new Sensor reading: line follows every 2.5 seconds, with the concentration
in PPM to five decimals. The values above are an example from one board on our
bench; yours depend on the gas around the sensor and on the sensor type your
sketch uses. The library never reports a value below zero: it returns 0
instead, so 0.00000 is a normal reading.
If you see ERROR: Can't init the sensor! Check connections and jumper address!
instead, the board did not answer at 0x30.
5. If it does not work
Continue with Troubleshooting and retry this smallest example after each change.
1. Connect the breakout board
Plug a Qwiic cable into either Qwiic connector on the breakout and into the Qwiic connector on your controller. Both connectors carry the same I2C bus and the same 3.3 V supply.
| NULA DeepSleep | Soldered Electrochemical H2S Gas Sensor Breakout (Qwiic) |
|---|---|
| Qwiic connector | Qwiic connector |
Without Qwiic: breadboard wiring
Use the top header row instead. Power the board from 3.3 V only: it has no regulator.
| NULA DeepSleep | Soldered Electrochemical H2S Gas Sensor Breakout (Qwiic) |
|---|---|
| GND | GND |
| 3V3 | 3V3 |
| IO8 | SDA1 |
| IO9 | SCL1 |
The example in step 3 opens I2C with sda=Pin(21) and scl=Pin(22), not
IO8 and IO9. If you wire the header as in this table, change those two numbers
in the example's I2C(...) line to the GPIOs you wired to SDA1 and SCL1, so the
code uses the same pins as your wires.
2. Install the module
After installing the mpremote package, install the library on your board using the following command:
mpremote mip install github:SolderedElectronics/Soldered-ElectrochemicalGasSensor-MicroPython-Library
Or, if you're running a Windows OS:
python -m mpremote mip install github:SolderedElectronics/Soldered-ElectrochemicalGasSensor-MicroPython-Library
🔗Soldered-ElectrochemicalGasSensor-MicroPython-Library
Verified MicroPython module at commit 623e1e6
Tip: downloading from GitHub. Without mpremote, open each of the module's
.py files (ElectrochemicalGasSensor.py, ads1115.py and lmp91000.py) on
GitHub and click Download raw file, then open it in Thonny and use
File → Save as... → MicroPython device to copy it onto the board.
3. Run the first example
This is the module's electrochemical-bridgeBoard.py example, which talks to
the board at 0x30. Before you run it, make two changes:
- It is written with
SENSOR_O3, the module's ozone preset, so its PPM values are not H2S values. Do not switch it to the module'sSENSOR_H2Spreset unchanged: that preset is written for the SGX-4H2S-100 cell, with a sensitivity of 1200 nA per ppm, while this board carries the SGX-4H2S-300 cell, whose datasheet gives an output signal of 460 ± 140 nA per ppm. WithSENSOR_H2Sthe reading comes out about 2.6 times too low. Use a customSensorConfigwith theSENSOR_H2Ssettings and 460 nA per ppm instead, as shown below the list. - It opens I2C bus 0 with SCL on GPIO 22 and SDA on GPIO 21. Change these to the I2C pins of your controller's Qwiic connector if they differ.
Replace the example's import line from ElectrochemicalGasSensor with:
from ElectrochemicalGasSensor import (
    ElectrochemicalGasSensor, SensorConfig,
    TIA_GAIN_7_KOHM, RLOAD_10_OHM, REF_EXTERNAL,
    INTERNAL_ZERO_20_PERCENT, BIAS_SIGN_POSITIVE, BIAS_0_PERCENT,
    FET_SHORT_DISABLED, OP_MODE_3LEAD_AMP_CELL,
)
from ads1115 import ADS_GAIN_4_096V

SENSOR_CUSTOM = SensorConfig(
    nano_amperes_per_ppm=460.0,
    internal_zero_calibration=0,
    ads_gain=ADS_GAIN_4_096V,
    tia_gain=TIA_GAIN_7_KOHM,
    rload=RLOAD_10_OHM,
    ref_source=REF_EXTERNAL,
    internal_zero=INTERNAL_ZERO_20_PERCENT,
    bias_sign=BIAS_SIGN_POSITIVE,
    bias=BIAS_0_PERCENT,
    fet_short=FET_SHORT_DISABLED,
    op_mode=OP_MODE_3LEAD_AMP_CELL,
)
and the line that creates sensor with:
sensor = ElectrochemicalGasSensor(SENSOR_CUSTOM, i2c, adc_addr=0x30)
The unchanged example follows.
# FILE: electrochemical-bridgeBoard.py

from machine import I2C, Pin
import time
from ElectrochemicalGasSensor import ElectrochemicalGasSensor, SENSOR_O3

# Initialize I2C
i2c = I2C(0, scl=Pin(22), sda=Pin(21))

sensor = ElectrochemicalGasSensor(SENSOR_O3, i2c, adc_addr=0x30)

# -------------------------------------------------------------------------
# Setup
# -------------------------------------------------------------------------
print("Electrochemical Gas Sensor - ATtiny Bridge Board Example")

if not sensor.begin():
    print("ERROR: Can't init the sensor! Check connections and jumper address!")
    while True:
        time.sleep_ms(100)

print("Sensor initialized successfully!")

# -------------------------------------------------------------------------
# Main loop
# -------------------------------------------------------------------------
while True:
    reading = sensor.getPPM()

    # If PPB is more relevant for your sensor, use:
    # reading = sensor.getPPB()

    print("Sensor reading: {:.5f} PPM".format(reading))

    time.sleep_ms(2500)
4. Check the result
When the board answers, the shell shows:
Electrochemical Gas Sensor - ATtiny Bridge Board Example
Sensor initialized successfully!
Sensor reading: 0.00198 PPM
Sensor reading: 0.00201 PPM
Sensor reading: 0.00199 PPM
Sensor reading: 0.00200 PPM
A new Sensor reading: line follows every 2.5 seconds, with the concentration
in PPM to five decimals. The values above are an example from one board on our
bench; yours depend on the gas around the sensor and on the sensor type your
script uses. The module never reports a value below zero: it returns 0
instead, so 0.00000 is a normal reading.
If you see ERROR: Can't init the sensor! Check connections and jumper address!
instead, the board did not answer at 0x30.
5. If it does not work
Continue with Troubleshooting and retry this smallest example after each change.