Quick Start
Plug the breakout into your controller with a Qwiic cable, install the library, and run its first example. The example ships with another gas's preset, so step 3 says which name to change to read ammonia in ppm. The board answers on I2C address 0x30 until you move its ADDRESS switch.
You program the controller connected to this breakout. The breakout itself is not flashed.
- Arduino
- MicroPython
1. Connect the breakout board
Qwiic means no soldering: plug one end of a Qwiic cable into your controller and the other into either Qwiic connector on the breakout. The cable carries 3.3 V, GND and the I2C lines.
| NULA DeepSleep | Soldered Electrochemical NH3 Gas Sensor Breakout (Qwiic) |
|---|---|
| Qwiic connector | Qwiic connector |
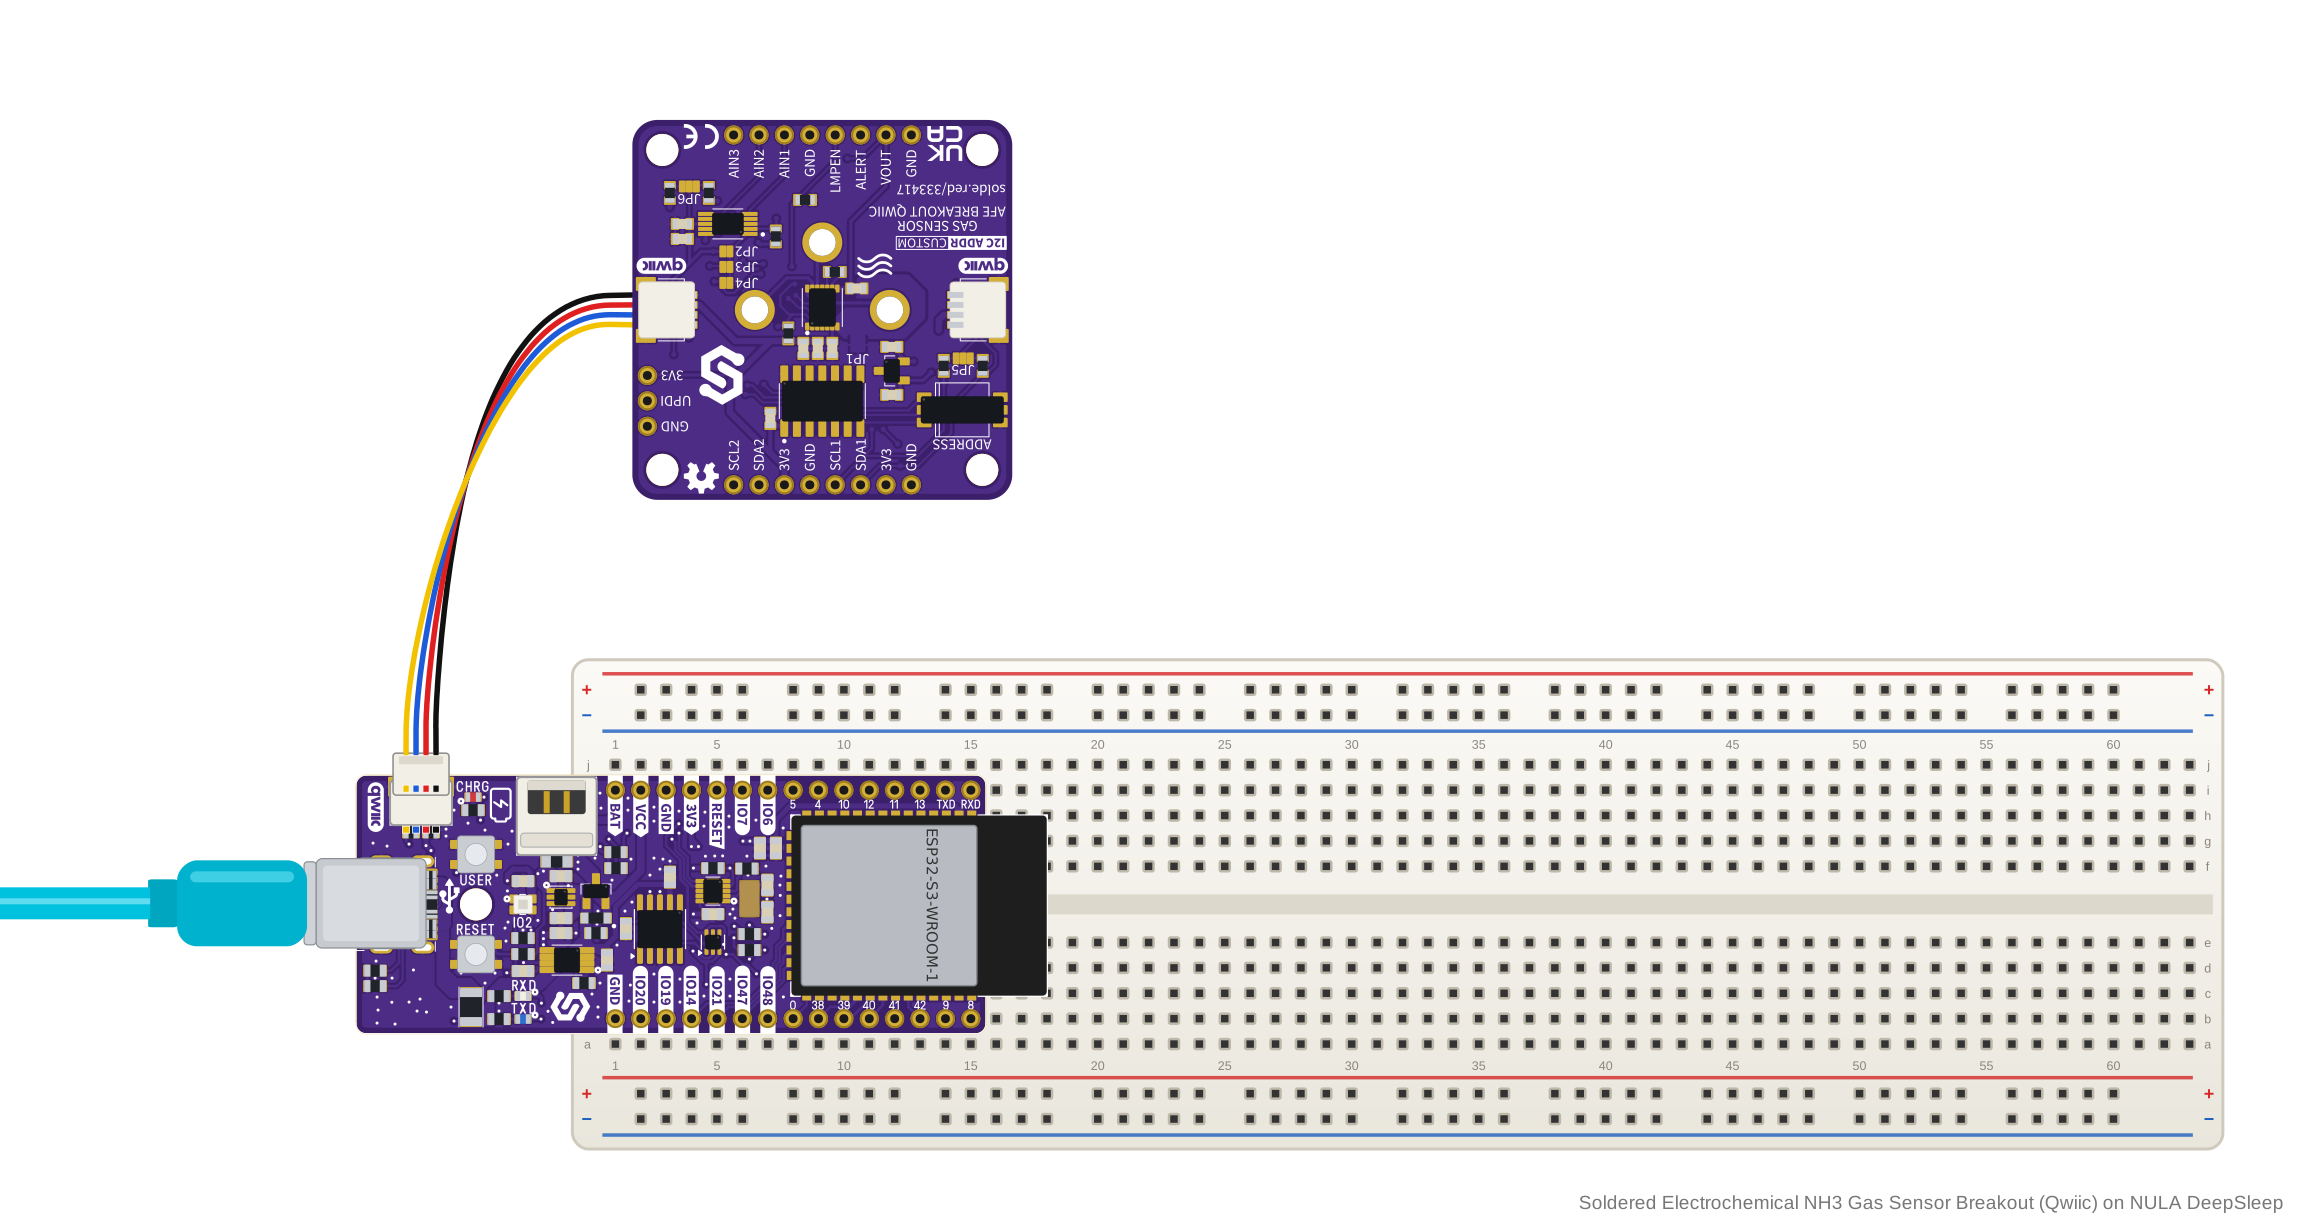
The board runs from 3.3 V only and has no regulator. The header and both Qwiic connectors share that one 3.3 V supply, so never feed it 5 V.
Without Qwiic: jumper-wire wiring
The board is not breadboard compatible, so connect it with jumper wires to the header pins. Wire the header's SDA1/SCL1 pair, the same bus the Qwiic connectors carry, to your controller's I2C pins. Leave SDA2/SCL2 unconnected: that pair is the board's own bus between the ATtiny404, the analog front end and the ADC.
| NULA DeepSleep | Soldered Electrochemical NH3 Gas Sensor Breakout (Qwiic) |
|---|---|
| GND | GND |
| 3V3 | 3V3 |
| IO8 | SDA1 |
| IO9 | SCL1 |
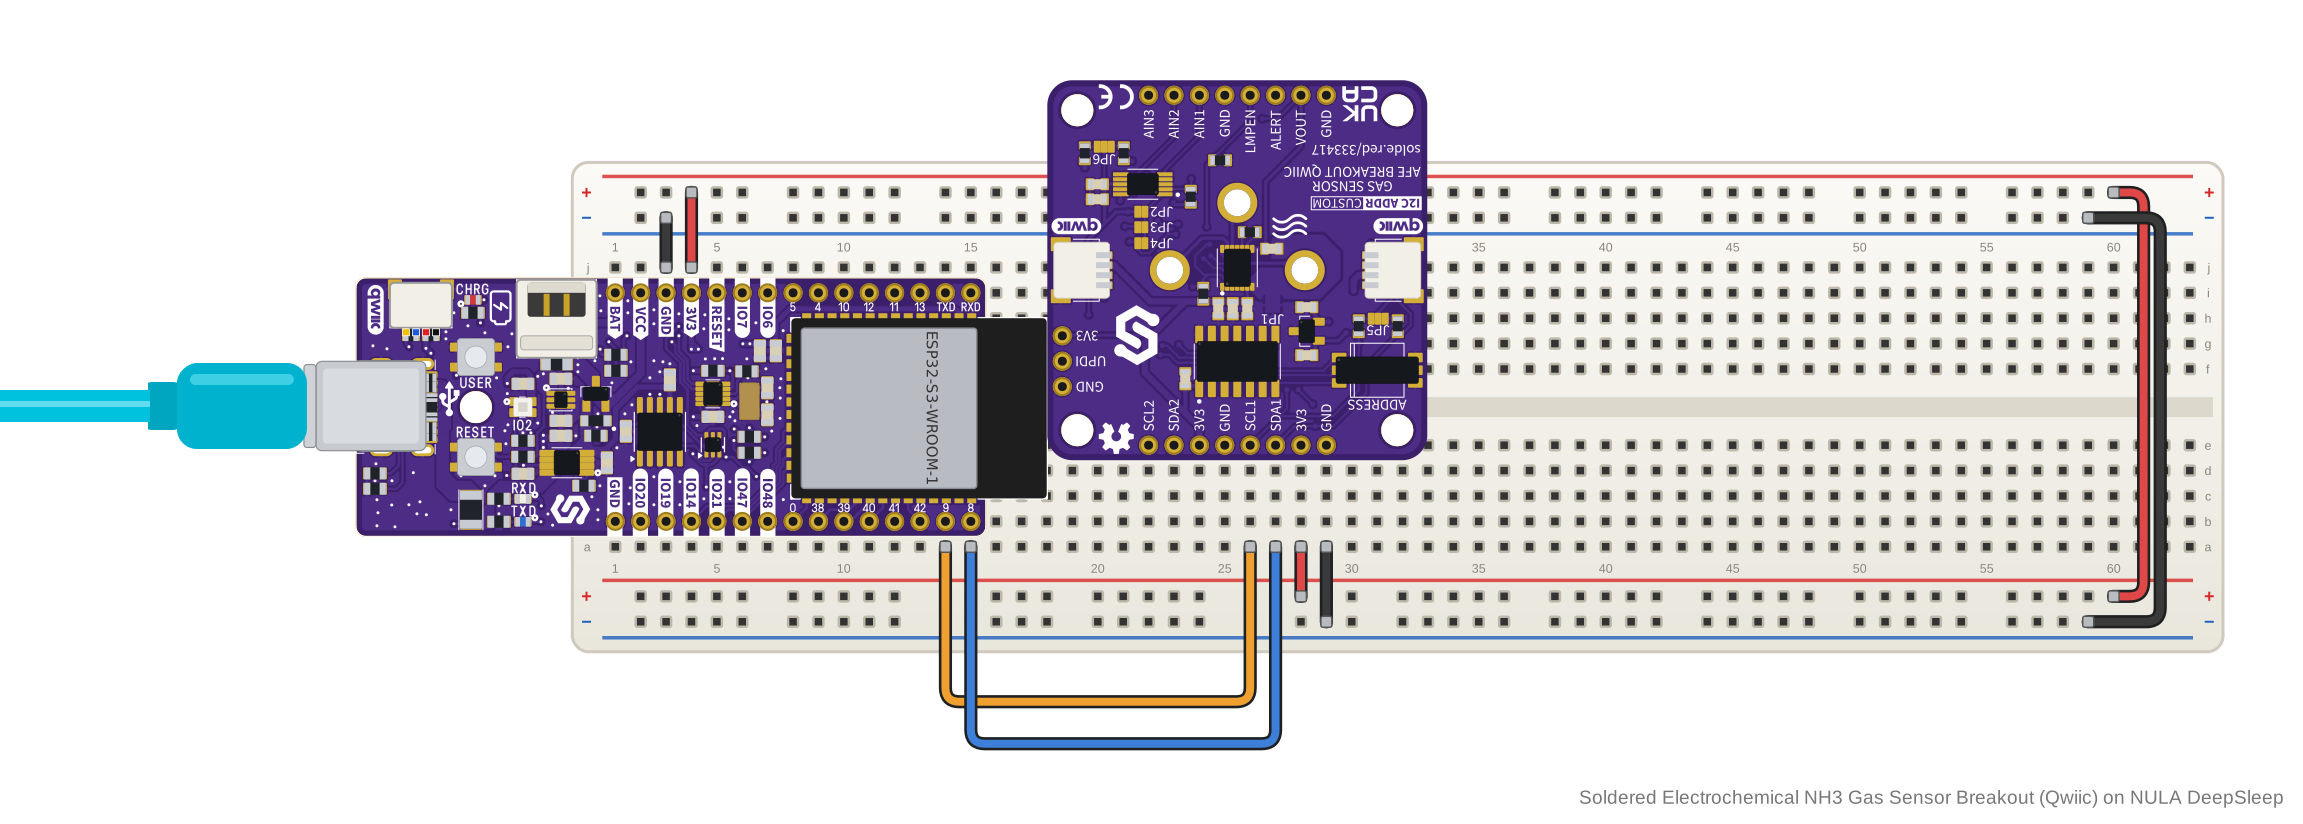
2. Install the library
Install Electrochemical Gas Sensor Soldered from its GitHub repository as a .ZIP library. The ZIP holds the library as its main branch is today, not a fixed commit. These pages were checked against commit c4df54b, which the link below opens.
🔗Electrochemical Gas Sensor Soldered
Verified Arduino library at commit c4df54b
Tip: downloading from GitHub. On the library's GitHub page, click the green Code button and choose Download ZIP, then add it in Arduino IDE with Sketch → Include Library → Add .ZIP Library....
3. Run the first example
This is the library's bridgeBoard example, written for this board's ATtiny404 bridge. It creates the sensor on address 0x30, starts it, and prints a reading every 2.5 seconds. If you moved the ADDRESS switch, the board answers on that address (0x30 to 0x37) instead.
The example creates the sensor with SENSOR_CO, the library's carbon monoxide preset. SENSOR_NH3 is the library's preset for the SGX-4NH3 cell on this board, and the ppm conversion uses the preset's sensitivity: 70 nA/ppm for SENSOR_CO, 40 nA/ppm for SENSOR_NH3. As shipped, the example's readings are therefore not ammonia ppm. To read ammonia, change SENSOR_CO to SENSOR_NH3 in the line that creates the sensor.
The example's comments say to set the address with jumpers on the back of the board. On this board the address is set with the three-position ADDRESS switch. The 0x49/0x4A/0x4B the comments mention are ADS1115 addresses, not addresses this board answers on. Where the comments say LMPEN is hardwired to GND, on this board a 10 kΩ resistor pulls it to GND: leave it unconnected.
/**
 **************************************************
 *
 * @file        bridgeBoard.ino
 * @brief       See how to init a sensor on the new ATtiny404 bridge board revision,
 *
 *              To successfully run the sketch:
 *              - Set the desired address using the jumpers on the back of the board
 *                (address = 0x30 + jumper offset, giving a range of 0x30-0x37)
 *              - Run the sketch and open serial monitor at 115200 baud!
 *
 *              Note: on this board revision, LMPEN is hardwired to GND, so there's
 *              no configPin argument to pass - the constructor's third argument
 *              is ignored whenever the address falls in the bridge range (0x30-0x37).
 *
 * @authors     @ soldered.com
 ***************************************************/

// Include the required library
#include "Electrochemical-Gas-Sensor-SOLDERED.h"

// Any additional boards on the same bus just need a different jumper setting
// (0x30-0x37), same as twoSensors.ino does for legacy boards with 0x49/0x4A/0x4B.
ElectrochemicalGasSensor sensor(SENSOR_CO, 0x30);

void setup()
{
    Serial.begin(115200); // For debugging

    // Init the breakout
    if (!sensor.begin())
    {
        // Can't init? Notify the user and go to infinite loop
        Serial.println("ERROR: Can't init the sensor! Check connections and jumper address!");
        while (true)
            delay(100);
    }

    Serial.println("Sensor initialized successfully!");
}

void loop()
{
    // Make the reading
    double reading = sensor.getPPM();

    // If PPB is more relevant for your sensor, you can use:
    // double reading = sensor.getPPB();

    // Print the reading with 5 digits of precision
    Serial.print("Sensor reading: ");
    Serial.print(reading, 5);
    Serial.println(" PPM");

    // Wait a bit before reading again
    delay(2500);
}
4. Check the result
Open the Serial Monitor at 115200 baud. When the board answers, you see:
Sensor initialized successfully!
After that, a line starting with Sensor reading: follows every 2.5 seconds, with the concentration in ppm to five decimals. The library never reports a negative concentration: a result below zero is printed as 0.
If you see ERROR: Can't init the sensor! Check connections and jumper address! instead, the board did not answer on the address in the sketch.
5. If it does not work
Continue with Troubleshooting and retry this smallest example after each change.
1. Connect the breakout board
Qwiic means no soldering: plug one end of a Qwiic cable into your controller and the other into either Qwiic connector on the breakout. The cable carries 3.3 V, GND and the I2C lines.
| NULA DeepSleep | Soldered Electrochemical NH3 Gas Sensor Breakout (Qwiic) |
|---|---|
| Qwiic connector | Qwiic connector |
The example sets SDA to pin 21 and SCL to pin 22. On the NULA DeepSleep, change them to 8 (SDA) and 9 (SCL), the board's I2C pins shown in the diagram.
The board runs from 3.3 V only and has no regulator. The header and both Qwiic connectors share that one 3.3 V supply, so never feed it 5 V.
Without Qwiic: jumper-wire wiring
The board is not breadboard compatible, so connect it with jumper wires to the header pins. Wire the header's SDA1/SCL1 pair, the same bus the Qwiic connectors carry, to your controller's I2C pins. Leave SDA2/SCL2 unconnected: that pair is the board's own bus between the ATtiny404, the analog front end and the ADC.
| NULA DeepSleep | Soldered Electrochemical NH3 Gas Sensor Breakout (Qwiic) |
|---|---|
| GND | GND |
| 3V3 | 3V3 |
| IO8 | SDA1 |
| IO9 | SCL1 |
The example sets SDA to pin 21 and SCL to pin 22. On the NULA DeepSleep, change them to 8 (SDA) and 9 (SCL), the board's I2C pins shown in the diagram.
2. Install the module
After installing the mpremote package, install the library on your board using the following command:
mpremote mip install github:SolderedElectronics/Soldered-ElectrochemicalGasSensor-MicroPython-Library
Or, if you're running a Windows OS:
python -m mpremote mip install github:SolderedElectronics/Soldered-ElectrochemicalGasSensor-MicroPython-Library
The command names no commit, so it installs the module as the repository is today. These pages were checked against commit 623e1e6, which the link below opens.
🔗Soldered ElectrochemicalGasSensor MicroPython Library
Verified MicroPython module at commit 623e1e6
Tip: downloading from GitHub. Without mpremote, open each of the three
module files on GitHub, ElectrochemicalGasSensor.py, lmp91000.py and
ads1115.py, and click Download raw file. Then open each one in Thonny and
use File → Save as... → MicroPython device to copy it onto the board.
The library is these three files: ElectrochemicalGasSensor.py imports lmp91000.py and ads1115.py, so all three must be on the board.
3. Run the first example
This is the module's electrochemical-bridgeBoard.py example, written for this board's ATtiny404 bridge. It opens I2C bus 0 on pin 22 (SCL) and pin 21 (SDA), creates the sensor on address 0x30, and prints a reading every 2.5 seconds. If you moved the ADDRESS switch, the board answers on that address (0x30 to 0x37) instead.
The example uses the ozone preset, SENSOR_O3. SENSOR_NH3 is the module's preset for the SGX-4NH3 cell on this board, and the ppm conversion uses the preset's sensitivity: -1000 nA/ppm for SENSOR_O3, 40 nA/ppm for SENSOR_NH3. As shipped, the example's readings are therefore not ammonia ppm. To read ammonia, change SENSOR_O3 to SENSOR_NH3 in the import line and in the line that creates the sensor.
The example's comments say to set the address with jumpers on the back of the board. On this board the address is set with the three-position ADDRESS switch. The 0x49/0x4A/0x4B the comments mention are ADS1115 addresses, not addresses this board answers on. Where the comments say LMPEN is hardwired to GND, on this board a 10 kΩ resistor pulls it to GND: leave it unconnected.
# FILE: electrochemical-bridgeBoard.py
# AUTHOR: Fran Fodor @ Soldered
# BRIEF: Single sensor PPM reading example for the ATtiny404 bridge board revision,
#        which allows daisy-chaining multiple boards on one I2C bus.
# LAST UPDATED: 2026-07-23

# Connecting diagram:
#
# Qwiic------------------------>Qwiic
#
# Note: on this board revision, LMPEN is hardwired to GND, so there's no
# config_pin to set - it's ignored whenever adc_addr falls in the bridge
# range (0x30-0x37). Set the desired address using the jumpers on the back
# of the board before powering it on.

from machine import I2C, Pin
import time
from ElectrochemicalGasSensor import ElectrochemicalGasSensor, SENSOR_O3

# Initialize I2C
i2c = I2C(0, scl=Pin(22), sda=Pin(21))

# (address = 0x30 + jumper offset, giving a range of 0x30-0x37).
# Any additional boards on the same bus just need a different jumper
# setting, same as twoSensors.py does for legacy boards with 0x49/0x4A/0x4B.
sensor = ElectrochemicalGasSensor(SENSOR_O3, i2c, adc_addr=0x30)

# -------------------------------------------------------------------------
# Setup
# -------------------------------------------------------------------------
print("Electrochemical Gas Sensor - ATtiny Bridge Board Example")

if not sensor.begin():
    print("ERROR: Can't init the sensor! Check connections and jumper address!")
    while True:
        time.sleep_ms(100)

print("Sensor initialized successfully!")

# -------------------------------------------------------------------------
# Main loop
# -------------------------------------------------------------------------
while True:
    reading = sensor.getPPM()

    # If PPB is more relevant for your sensor, use:
    # reading = sensor.getPPB()

    print("Sensor reading: {:.5f} PPM".format(reading))

    time.sleep_ms(2500)
🔗Open the complete example
electrochemical-bridgeBoard.py at commit 623e1e6
4. Check the result
When the board answers, the Thonny shell shows:
Electrochemical Gas Sensor - ATtiny Bridge Board Example
Sensor initialized successfully!
After that, a line starting with Sensor reading: follows every 2.5 seconds, with the concentration in ppm to five decimals. The module never reports a negative concentration: a result below zero is printed as 0.
5. If it does not work
Continue with Troubleshooting and retry this smallest example after each change.