Hardware Details
The SGX-4NO-250 cell sits on the underside of the board. An LMP91000 analog front end biases the cell and turns its current into a voltage, an ADS1115 16-bit ADC converts that voltage, and an ATtiny404 with factory firmware talks to both chips, so your controller sees one I2C device.
Key specifications
| Specification | Value |
|---|---|
| MCU | |
| Bridge MCU | Microchip ATtiny404 (factory firmware) |
| Interface | |
| Interface | I2C, analog, digital GPIO |
| Qwiic compatible | Yes, 2 x Qwiic |
| Default I2C address | 0x30 |
| I2C address changeable | Yes, 0x30 to 0x37 with the ADDRESS switch |
| Breadboard compatible | No |
| Power | |
| Supply voltage | 3.3 V (minimum and maximum), no regulator |
| Logic level | 3.3 V only |
| Other | |
| Analog front end | Texas Instruments LMP91000 |
| ADC | Texas Instruments ADS1115, 16-bit |
| Gas | Nitric oxide (NO) |
| Gas cell | SGX-4NO-250, electrochemical |
| Measurement range | 0 to 250 ppm NO; maximum overload 1000 ppm |
| Resolution | 0.5 ppm typical (electronics dependent) |
| Response time | T90 under 40 s |
| Repeatability | Under ±2% NO equivalent; linear |
| Operating conditions | -30 to 50 °C, 15 to 90% RH |
| Expected cell life | Over 12 months in air |
| Dimensions | 38 x 38 mm |
The cell's full figures, including its response to other gases, are in the SGX-4NO-250 datasheet.
Pinout
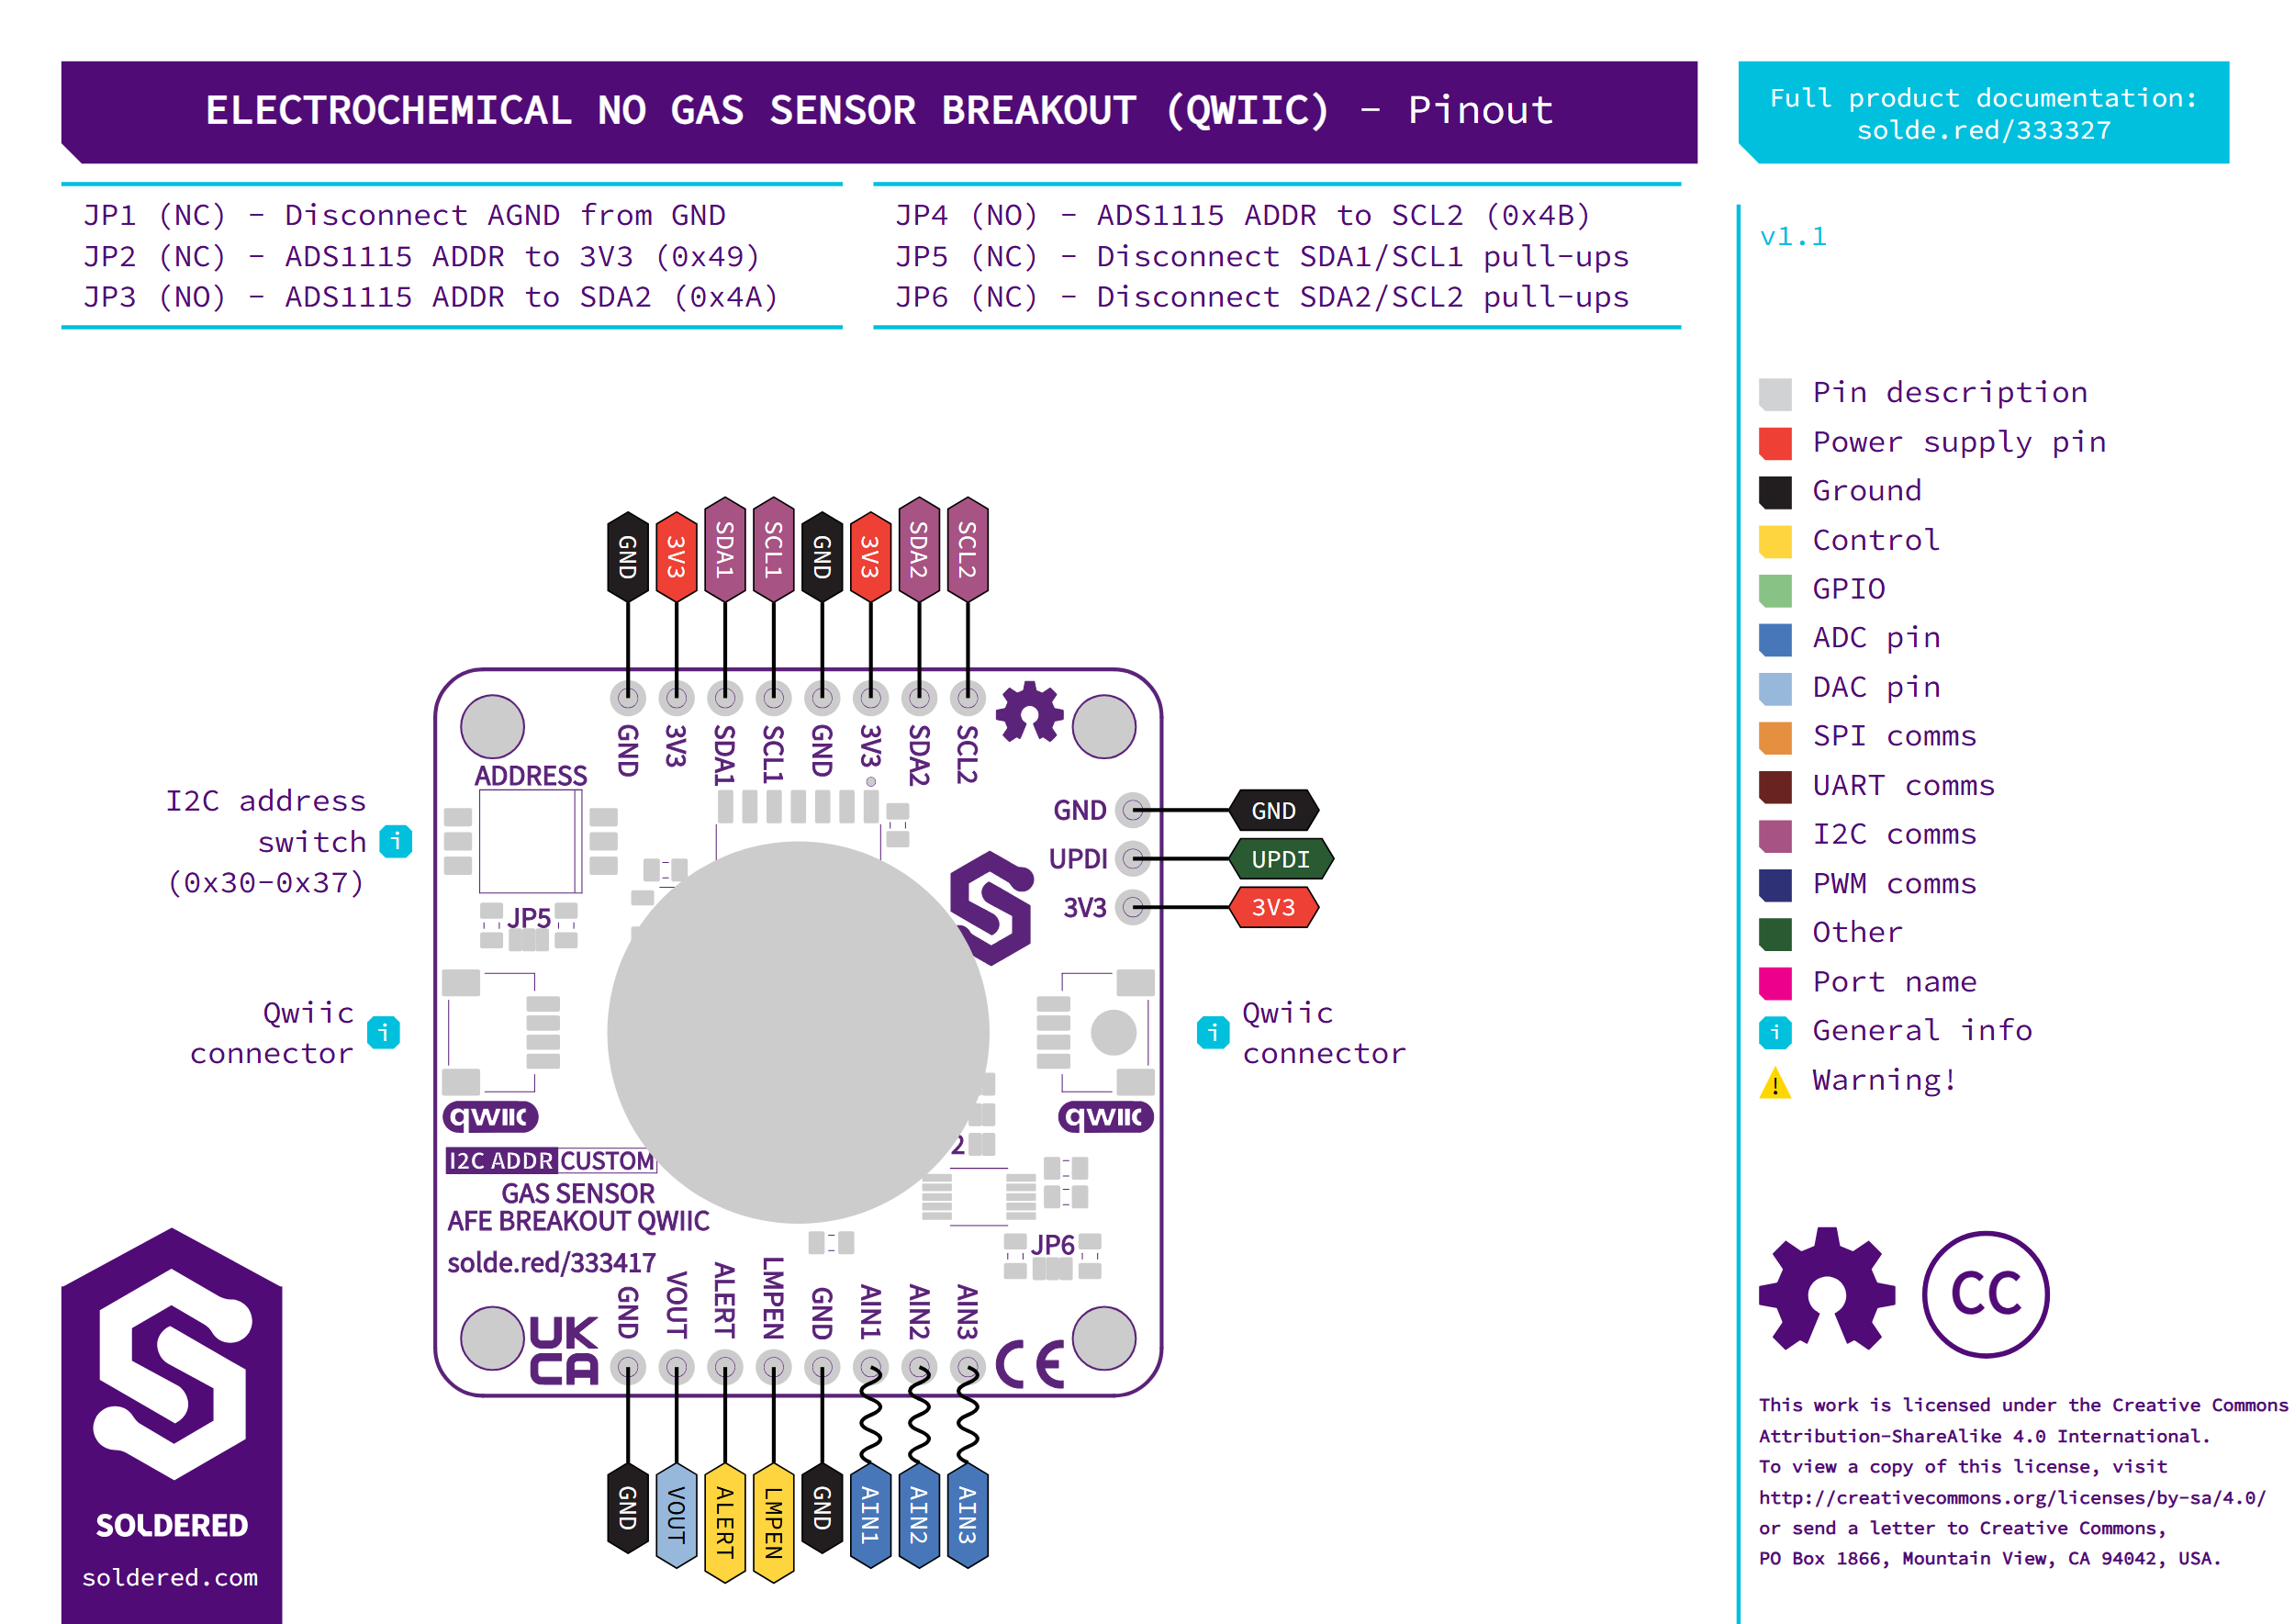
| Pin marking | Pin name | Description |
|---|---|---|
3V3 | 3.3 V supply | The board's only supply, 3.3 V. On the top edge (twice) and the right edge, shared with both Qwiic connectors. |
GND | Ground | On all three header edges. |
SDA1, SCL1 | I2C, controller side | I2C data and clock, on the top edge. The same lines as both Qwiic connectors: the bus your controller uses to reach the board's address. Pull-ups can be cut with JP5. |
SDA2, SCL2 | I2C, sensor side | I2C data and clock, on the top edge. The board's internal bus, between the ATtiny404 and the LMP91000 and ADS1115. Pull-ups can be cut with JP6. |
VOUT | Analog output | The analog front end's output voltage. |
ALERT | ADC alert | The ADS1115's ALERT pin. |
LMPEN | Front-end enable | The LMP91000's enable line. On this board a 10 kΩ resistor pulls it to GND, and it is also wired to the ATtiny404. The bridge examples' comments call it hardwired to GND; either way, at addresses 0x30 to 0x37 the libraries take no pin for it. |
AIN1, AIN2, AIN3 | Analog inputs | The ADS1115's other three inputs, for your own analog signals. |
UPDI | UPDI | On the right edge, next to GND and 3V3. The ATtiny404 runs factory firmware. |
The board has two Qwiic connectors, one on the left edge and one on the right.
Both carry SDA1/SCL1, so either one reaches the board's address.
Voltage and logic levels
| Connection | Supported voltage | Notes |
|---|---|---|
3V3 and Qwiic power | 3.3 V | No regulator. The header and both Qwiic connectors share this one supply. |
I2C, ALERT, LMPEN | 3.3 V logic | The board's logic level is 3.3 V only. |
Do not connect 5 V to 3V3 or to any signal pin. The board's supply and
logic level are 3.3 V only, and it has no regulator.
Dimensions
The board measures 38 x 38 mm, with a mounting hole in each corner.
Jumpers
| Jumper | Default | Function |
|---|---|---|
| ADDRESS switch (1 to 3) | 0x30 | Sets the board's I2C address from 0x30 to 0x37, so up to eight boards share one bus. Pass the same address to the library. Only the default, 0x30, is confirmed; which setting gives which other address is not yet. |
| JP1 | Closed | Cut to disconnect AGND from GND. |
| JP2 to JP4 | JP2 closed, JP3 and JP4 open | Set the ADS1115 address: JP2 ties ADDR to 3V3 (0x49), JP3 to SDA2 (0x4A), JP4 to SCL2 (0x4B). |
| JP5 | Closed | Cut to disconnect the SDA1/SCL1 pull-ups. |
| JP6 | Closed | Cut to disconnect the SDA2/SCL2 pull-ups. |
Keep exactly one of JP2, JP3 and JP4 closed. Each one ties the ADS1115's
ADDR pin to a different line, so two closed at once join those lines: JP2
with JP3 shorts 3V3 to SDA2, JP2 with JP4 shorts 3V3 to SCL2, and JP3
with JP4 shorts SDA2 to SCL2. With all three open, no jumper sets the
ADC's address. Cut JP2 before you bridge JP3 or JP4.